Sunday, February 12, 2012

Italian battleship Conte di Cavour sunk at Taranto, later salvaged but never returned to service.

     The Italian battleship Conte di Cavour was one of a class of three Italian dreadnaught-type battleships dating from the First World War.  As originally designed, the ships carried a main battery of thirteen 12-inch guns mounted in five center line turrets.  They had a maximum speed of only 21.5 knots.  They were comparable to the latest French and Austro-Hungarian battleships.  The Conte di Cavour and her sister ships saw little action during World War I, and by 1928 the remaining two ships (Conte di Cavour and Giulio Cesare) had been reduced to reserve status, their deficiencies and overall obsolesence being apparent.  The third ship of the class, the Leonardo da Vinci, had been lost due to an internal explosion on August 2, 1916, though later salvaged and ultimately scrapped. 

Battleship Conte di Cavour pre-modernization,
still in her World War I configuration and appearance.

     The Italians, under the leadership of Benito Mussolini, needed a strong fleet to project prestige and power over areas that Mussolini intended to rule or dominate.  Plans were drawn up to completely renovate and modernize the Conte di Cavour and Giulio Cesare, and later the battleships Andrea Doria and Caio Duilio as well.  In 1932, the French laid down two new battlecruisers of the Dunkerque class.  In October, 1933, the Conte di Cavour was taken in hand at Taranto for complete reconstruction and modernization.   The main battery was reduced in number, but was upgraded in caliber to 12.6 inch, along with increasing the elevation from 15 degrees to 30 degrees, with a corresponding increase in firing range.  New secondary batteries and heavy anti-aircraft batteries were mounted, and an entirely new propulsion system was installed raising power and maximum speed from 21.5 knots to 28 knots.  The new "pugliese" system designed to offer protection from torpedo hits was installed and built around the existing hull.  The entire superstructure was rebuilt, and aircraft facilities were added.  The ship, and later her sisters, were completely transformed into fast, powerful warships. 

Battleship Conti de Cavour as she
appeared following her reconstruction and modernization.

     The Conte di Cavour rejoined the fleet in late 1937.  She and her sister ship Giulio Cesare were fully operational when Italy joined the war in June, 1940.  Shortly thereafter, both of these ships were involved in action against British warships in what later became known as the Battle of Calabria or Punta Stilo, which was a tactical draw.  The Cavour briefly exchanged gunfire with the British battleships Warspite and Malaya, but neither inflicted damage or received damage herself, while her sister ship sustained one non-critical hit from a 15 inch shell fired from very long range by the Warspite.

The Conte di Cavour firing her main battery
during the Battle of Calabria or Punta Stilo.

     On the night of November 11 - 12, 1940, the British launched operation "Judgement", which was an attack on the main Italian naval base of Taranto by swordfish torpedo bombers launched from the British aircraft carrier Illustrious.  All six of Italy's battleships were moored at Taranto.  The British launched two separate waves of torpedo bombers in the surprise attack.  During the first wave, the Conte di Cavour was hit by one 18-inch aerial torpedo.  This one hit blasted a hole in her hull below the waterline measuring approximately 39 ft x 26 ft.  The Cavour began taking on water and sinking.  Attempts to move her to shallower water were delayed and not entirely successful.  She sank at her moorings with only portions of main battery and superstructure still above water.  The battleships Littorio and Caio Dulio were also struck by torpedoes, but damage control efforts kept them from completely sinking.  Initial salvage efforts on those two battleship were thus given priority over that of the Cavour

The Conte di Cavour sunk at Taranto Harbor
after being struck by one 18 inch torpedo dropped
from a British swordfish torpedo bomber.

     Salvage work did eventually commence on the Conte di Cavour, including the removal of her heavy guns to lighten her.  She was eventually raised in 1941 and drydocked at Taranto for five months for temporary repairs.  On December 22, 1941, she was moved under her own power to the naval base at Trieste to receive permanent repairs.  She was docked at the Montfalcone Shipyard at Trieste, sporting the "Claudus" camouflage scheme.  The ship was scheduled to receive further modernization, including the installation of newer and more effective secondary armament and heavy anti-aircraft guns.  Her repair work, however, was given a low priority. 

Battleship Conti de Cavour moored at Trieste,
undergoing repairs and further modernization.
Note the camouflage and part of her main armament missing.

     The Conte di Cavour's repair work was approximately 85% completed at the time of the Italian armistice in September, 1943, although work on her had ceased several months prior, priority being given to work on desperately needed escort vessels.  Prior to work being halted on her, her main battery guns had been re-installed, new secondary guns had been installed in the existing turrets, and the sponsons for the new heavy anti-aircraft weapons had been fitted and installed.  The Cavour was not manned and was unable to flee when the Italians surrendered, and she was seized at her moorings by the Germans.  The Germans considered continuing her repairs or alternatively removing some of her heavy guns for use as shore batteries, but in the end nothing more was done with her. 

     The immobilized Conte di Cavour came under attack by bombers of the United State Army Air Force on February 15, 1945.  She received some damage, and she began taking on water.  There was no damage control crew on board to try and check flooding, so she eventually capsized and sank at her moorings. She was subsequently raised in 1951-52 and scrapped. 

     Although the Conte di Cavour was salvaged and under repair after the British attack, she never again returned to service.  Thus, the British were entirely successful in eliminating this Italian battleship from the war in the Mediterranean for its duration. 


Friday, February 3, 2012

Light cruiser Bartolomeo Colleoni is first major Italian warship to be sunk

     On July 14, 1940, just over a month after Italy entered the war, two Italian light cruisers became engaged in combat with one Australian light cruiser and five British destroyers off Northwest Crete in what later became known as the Battle of Cape Spada. 

Italian light cruiser Bartolomeo Colleoni
steaming at high speed during the battle.

     The Italian light cruisers Bartolomeo Colleoni and Giovanni dalle Bande Nere, Rear Admiral Ferdinando Casardi commanding, were steaming from Tripoli in North Africa to the port of Leros in the Dodecanese Islands, which was Italian territory.  The Allied squadron, under command of Captain John Collins aboard the Australian light cruiser Sydney, accompanied by British destroyers, HavocHero, HastyHyperion, and Ilex, were patrolling in the Aegean sea. 

Italian light cruiser Giovanni dalle Bande Nere at sea.

Bartolomeo Colleoni in port.

The Bartolomeo Colleoni is hit during
the Battle of Cape Spada.

Bartolomeo Colleoni after losing her
bow to a torpedo hit.

The Bartolomeo Colleoni shortly before
exploding and sinking.

     At approximately 7:30 AM, the Italian vessels spotted four of the British destroyers and altered course to engage them in a running fight.  Unknown to the Italians, since they had no airborn reconnaissance, the Australian cruiser Sydney and a fifth destroyer, the Havoc, were only forty miles distant, and the British destroyers were luring the Italians within range of the Sydney.  Contact between the opposing cruisers was established at 8:26 AM, and the Sydney commenced firing on the Italians three minutes later.  The Italian admiral immediately turned away from the Sydney and her consorts and steamed to the Southwest. 

     Each of the Italian cruisers matched the Sydney in firepower.  All three cruisers mounted a main battery of eight, 6-inch guns and each carried torpedo tubes.  The Italian cruisers were also reportedly at least 6 to 8 knots faster than the Sydney, but of much lighter construction than the Australian ship.  Theoretically, the Italians, utilizing their advantage in speed, should have been able to make good their escape, but it was not to be.  Being launched in 1930, the Italian cruisers were slightly older than the Sydney, which was launched in 1934, and their initial trials during which their high speeds had been achieved were done with only light load displacement, without stores, ammunition, or all equipment on board.  Under fully loaded operational wartime conditions, the Italian ships were only marginally faster than their Australian counterpart. 

Australian light cruiser Sydney at sea.

Australian light cruiser Sydney showing
forward main battery turrets.

British destroyer Ilex.

British destroyer Hero.

     The Sydney's gunfire proved to be more accurate than that of the Italians.  During the running fight, the Sydney concentrated her fire on the Bartolomeo Colleoni, scoring several hits.  By 9:23 AM, the Bartolomeo Colleoni was dead in the water, having been hit by a shell in the boiler room and lost power.  The Giovanni dalle Bande Nere initially turned back to offer aid and assistance to her sister ship, but quickly realized that, now facing the Sydney and the five destroyers alone, she was completely outgunned and outnumbered.  She then turned and fled, under fire from the Sydney.  The Sydney achieved two hits on the Giovanni dalle Bande Nere, but did not stop her.  In return, the Sydney was only hit once in her funnel, which did nothing to impair her fighting efficiency.  The Giovanni dalle Bande Nere made good her escape to fight again another day.

     The British destroyers now had their turn with the helpless Bartolomeo Colleoni.  By 9:59 AM, the Bartolomeo Colleoni had lost her forward bow as far back at the number one turret as the result of a torpedo hit.  Destroyers Ilex and Hyperion finished off the Italian cruiser with three torpedoes.  There were 121 casualties aboard the Bartolomeo Colleoni, while 555 of her crew were rescued from the water by the British destroyers.

     The British battleship Warspite was in the general area and utilized her float plane to attempt to locate the fleeing Giovanni dalle Bande Nere, but did not find her.  Later in the day, the British destroyers were attacked by Italian aircraft, and the Havoc sustained damage to her boiler room.

The cruiser Giovanni dalle Bande Nere as
she appeared later in the war prior to her sinking in March, 1942. 

     The Giovanni dalle Bande Nere continued the fight against the Allies in the Mediterranean until March 22, 1942 when she was sunk after being hit by two torpedoes fired by the British submarine Urge.  The Sydney was lost on November 19, 1941 in the Indian Ocean near Australia when approaching the disguised German commerce raider Kormoran, which was posing as a merchant ship.  During an exchange of gunfire at point blank range, both ships sustained fatal damage and sank some distance apart.

Monday, January 23, 2012

Allied forces suffer defeat in the Battle of the Java Sea

     After the war in the Pacific began, the allied powers (United States, United Kingdom, Australia, and the Netherlands) began to combine their meager forces and set up rudimentary joint commands within the Philippines, Netherlands East Indies, British Malaya, and Singapore areas of operation.  The Japanese made steady progress in their movements to these areas, encountering resistance but being able to move forward and overwhelm the defenders in every instance.  The joint ABDA (American-British-Dutch-Australian) command was put into place.  This included naval forces of these four nations, which were first placed under the overall command of United States Admiral Thomas C. Hart, then later under the tactical command of Dutch Rear Admiral Karel Doorman.

Dutch Rear Admiral Karel Doorman,
commanding the ABDA combined striking force.

Japanese Vice Admiral Takeo Takagi,
commanding the Japanese escort force.

     The ABDA naval surface forces began to engage Japanese forces on January 23, 1942 at the Battle of Balikpanpan, following Japan's invasion of the Netherlands East Indies.  This initial confrontation was a tactical victory for the ABDA forces.  This was followed by the Battle of Palembang on February 13th, and the Battle of Badung Strait during the night of February 19th/20th, both Japanese victories.  ABDA naval forces also endured several air attacks from Japanese aircraft, which caused damage to U. S. heavy cruiser Houston, U. S. light cruiser Marblehead, and Netherlands light cruiser De Ruyter.  The Marblehead was so heavily damaged that she had to completely withdraw from the area.

Dutch light cruiser Java under Japanese air attack.  Allied warships came under
numerous air attacks as the Japanese advanced into the
Netherlands East Indies. 

     On February 27, 1942, the Japanese amphibious forces gathered to attack Java.  The available ABDA naval forces sortied from Surabaya under command of Rear Admiral Karel Doorman to intercept a Japanese invasion convoy approaching Java from the Makassar Strait.  The ABDA forces consisted of the United States heavy cruiser Houston, British heavy cruiser Exeter, Australian light cruiser Perth, Dutch light cruisers De Ruyter (flagship) and Java, and nine destroyers (British Electra, Encounter, Jupiter, Dutch Kortanaear, Witte de With, and United States Alden, John D. Edwards, John D. Ford, and Paul Jones).   Heavy cruiser Houston was already damaged and had one third of her main armament, located in her aft turret, out of action due to damage from an earlier air attack in the Battle of the Flores Sea.  Admiral Doorman still included Houston in his striking force because even with the damage, her remaining six 8-inch gun main battery equaled that of undamaged British heavy cruiser Exeter.  Not included in Admiral Doorman's striking force were the warships of the Western Striking Force that consisted of British light cruisers Danae and Dragon, Australian light cruiser Hobart, and three destroyers. 

Dutch light cruiser De Ruyter, flagship of
Rear Admiral Karel Doorman.

Dutch light cruiser Java, sunk in the
Battle of the Java Sea.  Sister ship
Sumatra did not participate in the battle.

United States heavy cruiser Houston, seen here
in February, 1942, prior to her participation
in the Battle of the Java Sea.  She was lost
shorterly thereafter in the Battle of the Sunda Strait.

British heavy cruiser Exeter.


Australian light cruiser Perth.

United States World War I era
destroyer Alden.  She participated in the battle
along with three of her sister ships.

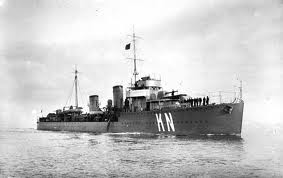
Dutch destroyer Witte de With.

British destroyer Encounter.

     The Japanese provided a strong naval escort for their amphibious landing force.  This escort, under command of Rear Admiral Takeo Takagi, consisted of heavy cruisers Nachi and Haguro, light cruisers Naka and Jintsu, and destroyers Yudachi, Samidare, Murasame, Harusame, Minegumo, Asagumo, Yukikaze, Tokitsukaze, Amatsukaze, Hatsukaze, Yamakaze, Kawakaze, Sazanami, and Ushio.  Each of the Japanese Heavy Cruisers were more powerful than either of their counterparts. Each mounted ten 8-inch weapons for the main battery as opposed to only six 8-inch on the Exeter and nine 8-inch (but only six operational) on the Houston.  The Nachi and Haguro were also faster, more heavily armored, and they carried the extremely potent 24 inch long lance torpedoes, as did all the other Japanese warships.  The Japanese destroyers were also larger, more numerous, and more powerful than their ABDA counterparts, particularly the four elderly United States destroyers, which were of World War I vintage. 

Japanese heavy cruiser Nachi.

Japanese heavy cruiser Haguro.

Japanese light cruiser Naka.

Japanese light cruiser Jintsu.

Japanese destroyer Asagumo.

Japanese destroyer Sazanami.

     Contact was made between the opposing forces in the mid afternoon, around 16:00 hours.  Admiral Doorman made attempts to bypass the Japanese naval escort and get at the troop transports.  His efforts were repulsed by Admiral Takagi's escorting warships.  The battle raged at long range intermittently from mid-afternoon until midnight.  Both sides expended large quantities of ammunition without achieving significant results.  The ABDA forces had never trained or worked together either, and Admiral Doorman had difficulty communicating his orders to the ships of the other navies. 

     Heavy Cruiser Exeter sustained an 8 inch shell hit that damaged a boiler room and substantially reduced her speed.  She was unable to keep formation, and she veered off, out of the fight.  Admiral Doorman ordered her to return to Surabaya, escorted by destroyer Witte de With.  The Japanese began launching their deadly long lance torpedoes.  92 torpedoes were fired at this time, but only the destroyer Kortenaear was struck.  She exploded, split in half, and sank quickly.  The destroyer Electra exchanged gunfire with cruiser Jintsu and destroyer Asagumo, but in turn she was seriously damaged and was abandoned.  The Asagumo was also damaged and forced to retire from the battle. 

Dutch destroyer Kortenaer, sunk in the
Battle of the Java Sea after being struck by
a Japanese long lance torpedo.

     Admiral Doorman broke off action at around 18:00 hours.  He ordered the United States destroyers to lay down a smoke screen to cover his withdrawal and also ordered them to launch a torpedo attack.  Torpedoes were launched, but the range was too great to permit a hit to be scored.  The United States destroyers, now without torpedoes, retired to Surabaya.  As night fell, Admiral Doorman made additional attempts to do an end run around the Japanese naval escorts to reach their troop transports.  Each attempt was repulsed.  At approximately 21:25 hours, destroyer Jupiter sank after she struck a mine.  Destroyer Encounter was detached to pick up survivors.  Doorman's striking force was now reduced to only four cruisers.  Long range gunfire was exchanged in the dark, but without results.  At approximately 23:00 hours, both the flagship cruiser De Ruyter and cruiser Java were struck by Japanese long lance torpedoes fired from long range and quickly sank.  Admiral Doorman went down with his flagship.  There were only 111 survivors from both ships.  Cruisers Houston and Perth then broke off action and set course for Tanjung Prior, arriving on February 28th.  Both of these ships were sunk the next date on March 1st when attempting to make their final escape to Australia during the Battle of Sunda Strait.


A memorial plaque remembering the loss
of cruisers Houston and Perth in the
Battle of the Sunda Strait.


      Damaged cruiser Exeter was intercepted also on March 1st as she attempted to make a run to Ceylon, escorted by destroyers H.M.S. Encounter and the U.S.S. Pope.  All three were intercepted by powerful Japanese surface forces and sunk.

British heavy cruiser Exeter sinking after
being overwhelmed by Japanese warships while trying
to escape from the Netherlands East Indies after the
previous day's Battle of the Java Sea.

United States destroyer Pope under heavy gunfire from
Japanese warships.  The Pope was assigned to escort the
damaged cruiser Exeter from the area after the previous
day's Battle of the Java Sea.


     The primary ABDA naval force had been almost completely destroyed.  The Japanese invasion of Java had been delayed by only one day.  All remaining ABDA naval and air forces were withdrawn to Australia.  All ABDA ground forces remaining in the Netherlands East Indies surrendered on March 9th.  After consolidating their gains, the Japanese turned their attention to the Indian Ocean and the British colony of Ceylon, including its naval bases of Colombo and Trincomalee, which were attacked in early April.  The "Divine Wind" was still blowing strongly in Southeast Asia.

Saturday, January 14, 2012

Japanese Indian Ocean Raid on Ceylon in April, 1942

Throughout the winter and early Spring of 1941/42, Japanese naval forces seemed unstoppable, roaming freely throughout the Central and Western Pacific Ocean, occupying territory and attacking allied military forces and facilities.  Following the loss of the H.M.S. Prince of Wales and H.M.S. Repulse within days of war being declared between the Japanese Empire and Great Britain, British and allied forces had been continuously pushed back and were retreating.  The Phillippines were lost, the great British fortress of Singapore was overrun, and much of the Dutch East Indies were brought under Japanese control.  Australia was being threatened, as were convoy routes in the Indian Ocean. 


Allied naval forces, those that had not been destroyed anyway, were withdrawn.  The British Eastern Fleet had withdrawn to the British colony of Ceylon, a large island off the coast of India.  The fleet was weak, but was being reinforced by warships transferred from other areas.  Admiral Sir James Somerville was appointed to command this fleet. 

The Japanese wasted no time in making plans to continue their offensive actions against the British.  They planned to deploy a large, powerful naval force into the Indian ocean to attack shipping and to attack the British base at Ceylon.  They hoped to destroy the remnants of the British Eastern Fleet as well.  On March 26, 1942, the large Japanese force, consisting of six aircraft carriers (Akagi, Kaga, Soryu, Hiryu, Shokaku, Zuikaku), four fast battleships (Kongo, Haruna, Hiei, Kirishima), three cruisers (Tone, Chikuma, Abukuma), and numerous destroyers, departed its base in the Dutch East Indies under command of Vice Admiral Chuichi Nagumo.

Vice Admiral Chuichi Nagumo,
commander of the Japanese striking force.

Japanese carrier Akagi, flagship of Vice Admiral Nagumo.

Japanese carrier Kaga.

Japanese carrier Soryu.

Japanese carrier Hiryu

Japanese carrier Shokaku.

Japanese carrier Zuikaku.

Japanese battleship Kongo.

Japanese battleship Haruna.

Japanese battleship Hiei.

Japanese battleship Kirishima.

Japanese Heavy Cruiser Tone.

Japanese heavy cruiser Chikuma.

Japanese light cruiser Abukuma.

Japanese destroyer Akigumo.

Admiral Somerville had been alerted of the Japanese deployment and general plans through signals that were intercepted and decrypted.  He estimated the Japanese fleet would attack Ceylon on April 1st or April 2nd, including the naval bases at Colombo and Trincomalee.  Unknown to the Japanese, before the war the British had been developing a secret base at Addu Atoll in the Maldive Islands.  Admiral Somerville decided to base his fleet there, rather than at Ceylon.  Admiral Somerville, flying his flag in battleship Warspite, chose to divide his fleet into two separate components.  The faster and more modern ships (carriers Formidable, Indomitable, battleship Warspite, heavy cruisers Cornwall and Dorsetshire, light cruisers Emerald and Enterprise, and several destroyers) were deemed "Force A".  The older and/or slower ships (carrier Hermes, battleships Revenge, Resolution, Ramilles, and Royal Sovereign, light cruisers Dragon, Caledon, and the Dutch Jacob Van Heemskerk, and several destroyers) were deemed "Force B".  Due to the slow speed of the Revenge class battleships, Force B would have been considered by some to be more of a liability than an asset to Somerville. 

British carrier Formidable.

British carrier Indomitable.

The small British carrier Hermes.

British battleship Warspite, flagship of
Admiral Sir James Somerville,
underway in the Indian Ocean.

British battleship Revenge.

British battleship Resolution.

British battleship Ramilles.

British battleship Royal Sovereign and
sister ships underway pre-war.

British heavy cruiser Cornwall, shown
here pre-war.

British heavy cruiser Dorsetshire.

British light cruiser Emerald.

British light cruiser Enterprise.

British light cruiser Dragon.

British light cruiser Caledon.

Dutch light cruiser Jacob van Heemskerk,
attached to British Eastern Fleet.

British destroyer Hotspur.

British destroyer Paladin.

British corvette Hollyhock, a companion to
carrier Hermes when she was attacked and sunk
by Japanese naval aircraft.  The Hollyhock was also sunk.

The Japanese attack on Ceylon failed to materialize on either April 1st or April 2nd as expected, although a smaller, independent Japanese force  had attacked and sunk several merchant ships in the Bay of Bengal.  Lacking current or accurate information as to the location of the main Japanese fleet, Admiral Somerville decided to return to Addu Atoll to re-fuel and to allow the Revenge class battleships to take on more water.  He decided to send the small carrier Hermes back to Trincomalee for some needed repairs, escorted by heavy cruisers Cornwall and Dorsetshire and the Australian destroyer VampireHermes and Vampire arrived at Trincomalee while the two heavy cruisers were diverted to Colombo.

On the evening of April 4th, a Catalina PBY flying boat search plane operating from Ceylon located the Japanese fleet approximately 400 miles South of Ceylon.  Somerville ordered the Cornwall and Dorsetshire to leave Colombo and rejoin his Force A at best speed.  The next morning, April 5th, the Japanese launched a large air attack on Colombo, Ceylon consisting of 125 bombers escorted by 36 Zero fighter aircraft.  The Japanese attacked and destroyed much of the shipping remaining in the harbor, including the immobilized destroyer H.M.S. Tenedos and the armed merchant cruiser H.M.S. Hector.

British destroyer Tenedos, which was sunk
in the harbor at Colombo, Ceylon during the Japanese air attack.

The Japanese aircraft also spotted Cornwall and Dorsetshire approximately 200 miles Southwest of Ceylon while they were steaming to rejoin Admiral Somerville.  The Japanese carriers launched a second air attack aimed at these two heavy cruisers.  They came under heavy air attack and were overwhelmed with bombs and torpedoes.  Both cruisers sank with a combined loss of 424 men killed.

British heavy cruiser Cornwall, on fire,
listing, and sinking after being attacked by
Japanese aircraft.  Sister ship Dorsetshire was
also sunk in this same attack.

Admiral Somerville planned to launch a night torpedo attack against the Japanese forces.  Somerville had the advantage of radar aboard not only some of his ships but also aboard some of his Albacore torpedo bombers.  Somerville also sought a night surface engagement.  Utilizing his advantage of radar, he felt, would allow the slow Revenge class battleships to bring their heavy main battery armament into action because the disadvantage of their slow speed would be somewhat negated at night.  Force B operated as a support group to Force A, conforming with its movements and maintaining station about 20 miles to the Westward of Force A.  Albacore search planes from Somerville's carriers located the Japanese fleet but unfortunately failed to give accurate contact information before they were shot down.  At one point, the two fleets came to within 200 miles or less of one another without contact being made.  During the night of April 5th, the British continued trying to locate the Japanese fleet but were not successful.  Since Cornwall and Dorsetshire had failed to rendezvous with Force A as ordered, Admiral Somerville suspected they may have been destroyed.  He dispatched a cruiser and destroyers to look for them, while the remainder of his forces returned to Addu Atoll.  Survivors were located in the water the next day and rescued by light cruiser Enterprise and her escorting destroyers Paladin and Panther.  Somerville continued to operate from Addu Atoll, searching for the Japanese, but was never again able to make contact with the Japanese striking force.

Admiral Sir James Somerville,
commander of the British Eastern Fleet.

Four days later, on April 9th, the Japanese launched an attack on the naval base at Trincomalee.  As before, the British had prior warning of the attack, which allowed the carrier Hermes, destroyer Vampire, and corvette Hollyhock to flee the harbor before the attack commenced, upon being ordered to do so.  The Hermes had no aircraft aboard, and thus had no fighter aircraft available to engage the Japanese bombers.  Her aircraft had been operating from land based air fields on Ceylon, and most had already been destroyed. The Hermes was equipped with only minimal anti-aircraft weaponry and was practically defenseless.   After the attack on Trincomalee was over, the Hermes and her consorts reversed course to return.  Unfortunately, they were located near the coast by Japanese aircraft and an attack was launched.  Seventy Japanese planes attacked these three ships, and the virtually defenseless Hermes sustained forty hits and quickly sank with heavy loss of life.  The Vampire and Hollyhock were also sunk.  Hospital ship Vita later picked up 590 survivors in the water from these three ships.

British carrier Hermes sinking after taking
at least 40 hits when being attacked by
Japanese naval aircraft.

Following the sinking of the Hermes, the Japanese fleet left the Indian Ocean, never to return again.  Ceylon had not been invaded, as had been feared, but the ferocity and strength of the Japanese naval air forces had overwhelmed the meager British defenses.  The Japanese admitted to losing no more than five aircraft, however the British claimed at least eighteen had been shot down.  The Japanese lost no ships, nor had any even come under attack, while the British lost the carrier Hermes, heavy cruisers Cornwall and Dorsetshire, destroyer Vampire, destroyer Tenedos, corvette Hollyhock, and numerous auxiliary and merchant vessels, as well as most of their aircraft.

The results clearly indicated that the Japanese had superior aircraft and used superior tactics compared to their British adversaries.  Japanese warships were also faster, and many were more modern than their British counterparts.  The British Admiralty deemed Ceylon to be too dangerous to continue serving as the Eastern Fleet's front line base.   On April 9th, Force A was withdrawn from Addu Atoll to Bombay, India, arriving April 13th, while Force B was withdrawn to the East coast of Africa, arriving April 15th.  For the next two and a half years, the activities of the British Eastern Fleet would be primarily reduced to escorting convoys, and the most modern ships were withdrawn from the Indian Ocean and sent to other theaters for duty there.  It would not be until 1944, when the newly created British Eastern Fleet was formed, that the British would begin undertaking limited offensive operations against the Japanese, which by then had been substantially weakened from the unrelenting assault they were under from the advancing United States military forces.